If you’re wondering how you can speed up your workflow in Lightroom, you’re on the right place. Shooting a wedding can be a lot of fun! You get to hang out with the most important persons at the party, put your creativity to work, and capture memories that will last a lifetime. It’s only after you get home, cull the wedding pictures and start editing, that the hard work really begins. If you shoot RAW, you know that what you see on the back of your camera after you take a picture is a .JPEG preview that the camera creates. When you import your RAW images into Lightroom, you lose all of that contrast and saturation that your camera applied to your .JPEG preview, and your images are basically… raw. They flatten out and don’t look nearly as good as they did on the back of your camera.
Some photographers use different presets that they purchased or make their own. Others edit each individual picture from scratch. And that can take a LOT of time. If you are anything like me, you like to use any trick out there that would help speed up your workflow. So, today I want to share just a couple Lightroom tricks I use and find really helpful.
1. Auto Advance Rating Option
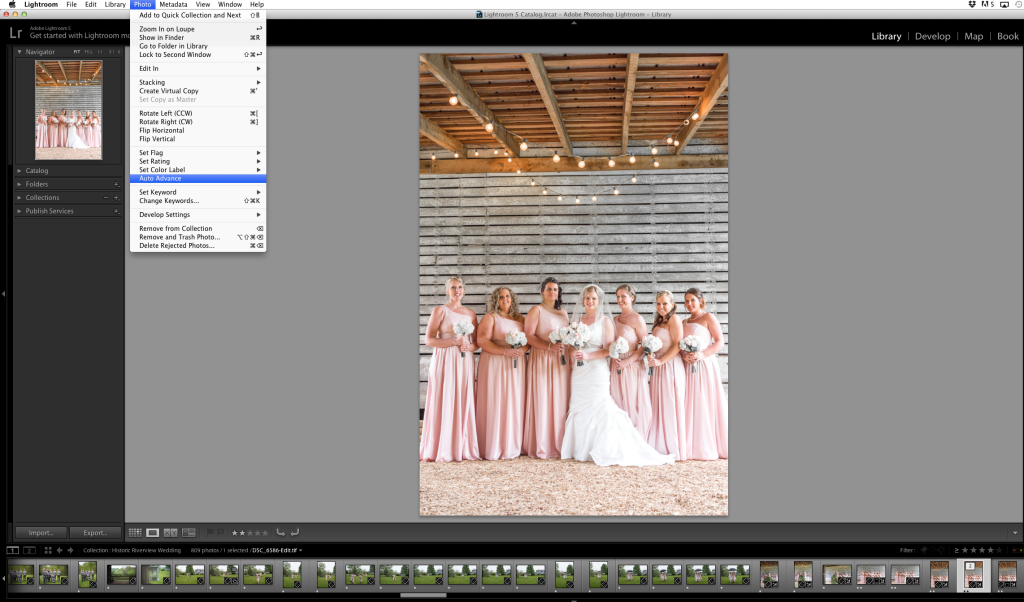
The very first thing I do after I import the images from a wedding into Lightroom is go through and delete the ones that do not meet my artistic standards (test shots, blinking pictures, etc.). This is also known as the culling process. For family formals and group shots in general, I always make sure to take duplicate photos to ensure that I get everyone in the pictures looking their best. As I am culling, I am also rating my pictures. I usually rate every picture one star, the ones I know I am going to use for the blog get two stars and the shots that I am most proud of, or consider to be some of the best I’ve ever shot, get 3 stars. Here’s where the “Auto Advance” rating option comes into play. After I rate a picture, instead of pressing the right arrow key to advance to the next photo, Lightroom automatically does that for me. I am telling you, this little trick can speed up your workflow tremendously!
Here’s how you set it up! In the Library module go to Photo – Auto Advance, or, if you like shortcuts better, just turn on CAPS LOCK and it will do the same trick. Just like so:

2. Solo Mode
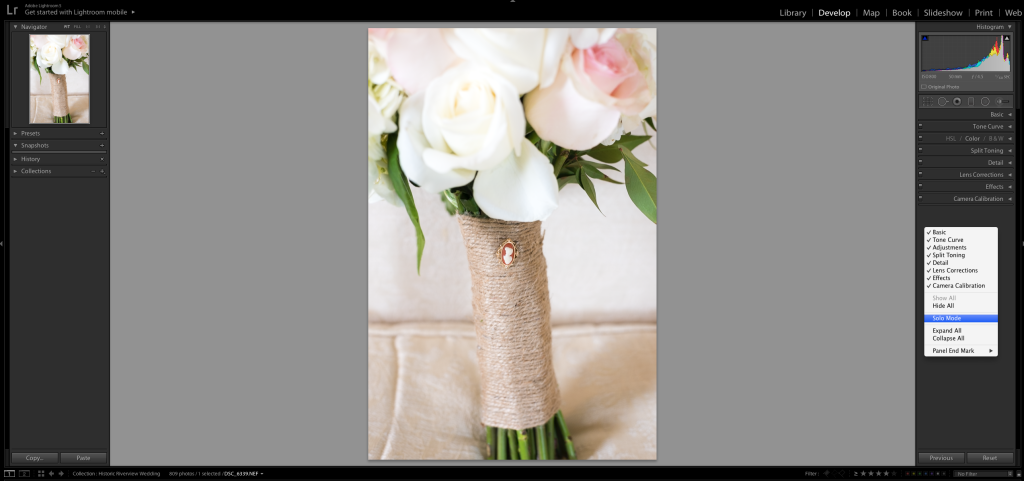
Do you often find yourself scrolling up and down the side panels in Lightroom, trying to find the one you need in order to make the adjustments you want for your pictures? That used to be me. Not anymore! By turning on the “Solo Mode” option Lightroom automatically closes a panel when I open another one. This option works great for me, as my side panel is a lot cleaner and easier to navigate. This option saves me a lot of time when I edit on my 13” MacBook instead of my iMac.
Here’s how you set it up! Simply right click anywhere in the sidebar and select the “Solo Mode” option from the drop down menu. Just like so:

These tips have definitely helped me speed up my workflow and I hope they will help you as well. If you are a photographer and have any tricks up your sleeve, I’d love to hear what they are and how they’ve helped you. I hope you all have a wonderful wedding season!
Love these tips!! I didn’t know about the auto advance! I normally just use the filter menu at the bottom right and when I am culling, I have the filter set on unrated. That way once I rate the pictures, it automatically leaves the screen and the next one pops up, if that makes sense. This also helps me know where I am in the culling process a little quicker in case LR gets shut down or I get up and walk away!
Excellent blog!
Allie
That’s a great tip, Allie!
Following!!! Your tips are great, thank you so much for sharing
You are so welcome, Adree! I’m so happy you are enjoying them.